Crafting Connections
Receive tips, freebies, and resource updates when you subscribe to my newsletter!

Teaching Upper Elementary Students to Decipher the Theme of a Story

Friday, September 6, 2024

Teaching upper elementary students how to infer the theme(s) of a book or a story can be daunting. This is a challenging topic for many students because it involves higher-level thinking skills. Providing scaffolds, like guiding questions and clue patterns, can be helpful for many students. Today, I am going to provide some tips that will hopefully help you teach students to decipher the theme. 

Tip #1: Connect this topic to a plot diagram.

Explain that authors leave clues that point toward the theme throughout the story. It is the job of the reader to recognize these clues when they are presented. If you have already introduced your students to plot diagrams, then showing your students a diagram like this can be beneficial.


Tip #2: Teach students clue patterns and guiding questions.

It's one thing to know that clues exist throughout the story, but it's another thing to recognize these clues while reading. Therefore, it is a good idea to teach students common patterns that authors use when they are dropping hints about their story's theme. Here are four patterns that occur frequently in books written for upper elementary readers. Below each type of clue, you will see a question that will guide your students toward deciphering the theme.

Teach students how to decipher the theme of a story.
(The images shown above were taken from my "Themes in Reading" PowerPoint lesson.)

Tip #3: Read aloud a picture book and MODEL the process of deciphering the theme.

Any time I have the opportunity to model a reading skill by using a picture book, I jump at the opportunity! I love to integrate a good picture book into my lessons. If you are a fellow fan of using picture books to model reading skills (or you think you want to try it!), I invite you to download this book companion worksheet that I created to help students learn how to interpret the theme of a story. (Just click on the image to download it for free!)
Teaching Upper Elementary Students to Decipher the Theme of a Story with this FREE Printable!

Picture books written by Patricia Polacco are perfect for a reading lesson where you are modeling for students how to infer the theme. Below, you will see how you and your students might fill out this sheet after reading My Rotten Redheaded Older Brother to them.

Teach students to decipher the theme by modeling with picture books!

If you are interested in having your students further explore the topics presented in this blog post, you should check out my brand-new "Themes in Reading PowerPoint"! I am super excited about this PowerPoint, as it has been percolating in the back of my mind for several years, and I finally buckled down and created it!
Themes in Reading PowerPoint

Have a great day!

Deb


Pin for later:


Teaching ELA Content through these Teach-and-Task Lessons!

Thursday, February 25, 2021
Have you ever felt bogged down with keeping all of the components of your upcoming lessons organized? I know I often did! I would have piles for each lesson. The pile might include a book I was planning to reference, a few papers or posters that I was going to display using the document camera, and of course, a set of clipped worksheets that would allow for independent practice.

I created a new line of ELA resources that could help reduce the number of stacks on your desk. They are paperless and compatible with Google Slides. I have been calling them my "teach-and-task lessons" because each lesson includes instructional slides and matching activities to follow up the content that you have just taught. I have teach-and-task lessons for twelve important ELA topics. (All of the topics are listed near the end of this post.) Let me show you how they are structured by sharing images and explanations from my main idea set

Check out Deb's teach-and-task lessons. They include both instructional slides and practice slides for students. Pictured here are some slides from my main idea set, but I have lessons for twelve different ELA topics.


Main Idea Lesson #2: Teaching Slides (Slides 1-7)

Check out Deb's teach-and-task lessons. They include both instructional slides and practice slides for students. Pictured here are some slides from my main idea set, but I have lessons for twelve different ELA topics.
The first two slides are used to introduce the ice cream cone graphic organizer. 

Next, students watch as you guide them through reading a passage, identifying the main idea, and writing it in the cone section of the graphic organizer. The speech bubbles make it so that the answers are right on the slides for you, and you (as the teacher) don't have to try to come up with the main idea while you are teaching.
Check out Deb's teach-and-task lessons. They include both instructional slides and practice slides for students. Pictured here are some slides from my main idea set, but I have lessons for twelve different ELA topics.

Check out Deb's teach-and-task lessons. They include both instructional slides and practice slides for students. Pictured here are some slides from my main idea set, but I have lessons for twelve different ELA topics.
After identifying the main idea, you and your students can reread the passage, and view the important details that support the main idea sentence. When you advance to the seventh slide, they will see how the details have been added to the graphic organizer. 
Check out Deb's teach-and-task lessons. They include both instructional slides and practice slides for students. Pictured here are some slides from my main idea set, but I have lessons for twelve different ELA topics.


Main Idea Lesson #2: Task Slides (Slides 8-11)

Check out Deb's teach-and-task lessons. They include both instructional slides and practice slides for students. Pictured here are some slides from my main idea set, but I have lessons for twelve different ELA topics.
After working through the teaching slides, now it is the students' turn to practice with these two practice passages. They read the passages and fill out the graphic organizers independently. (The yellow boxes are text boxes.) If they want to refer to the teaching slides, they are readily available for easy reference.
Check out Deb's teach-and-task lessons. They include both instructional slides and practice slides for students. Pictured here are some slides from my main idea set, but I have lessons for twelve different ELA topics.

This is just one of the lessons in my main idea set. Teachers who purchase the main idea set will receive four lessons. The lessons advance from basic content to more complex. You can use these lessons over the course of four days to provide lots of targeted main idea instruction to your students.

A Complete List of Topics

As I mentioned earlier, I currently have lessons like this for twelve ELA topics! Click on the links below to view each topic.

I hope you enjoy using these teach-and-task lessons as much as I enjoyed creating them! 

Deb 


Pin this image to revisit this topic later:
Check out Deb's teach-and-task lessons. They include both instructional slides and practice slides for students. Pictured here are some slides from my main idea set, but I have lessons for twelve different ELA topics.


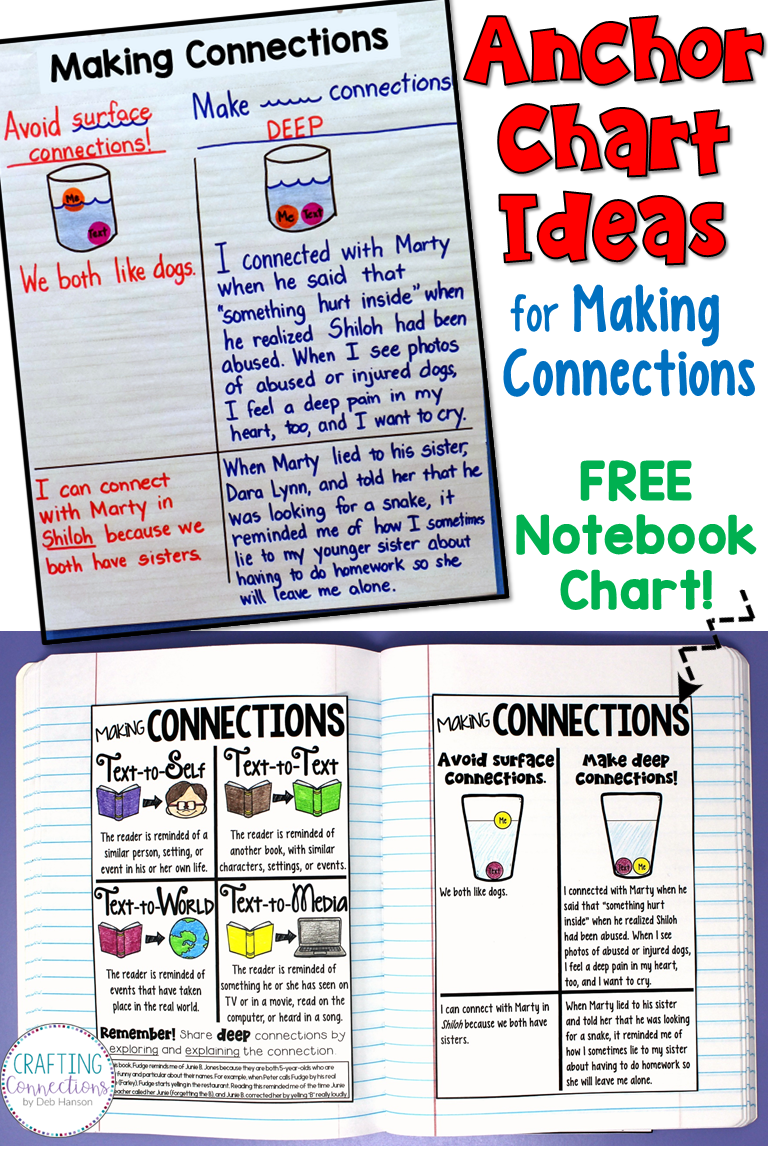
Anchor Chart: Making Deep Connections {FREEBIE}

Monday, September 21, 2020

Here is a scene that replayed itself more often than I would like to admit when I was teaching reading. Has it ever happened to you? When our reading group time was drawing to a close, I would announce the pages I expected my students to read on their own, hand each student a sticky note, and tell them their assignment was to read the assigned pages and record a connection they made while reading the pages. From previous lessons, students already knew that they could choose between making a text-to-self connection, a text-to-text connection, or a text-to-world connection. I had modeled writing strong connections several times, and I felt like students should know my expectations.

Much to my disappointment, however, more than half of my students would return to the next day's reading group with a very weak connection quickly scribbled on their sticky note... something like "I can connect with Peter because we both have annoying little brothers", or "Shiloh reminds me of A Dog's Life because both books are about a dog". I would ask questions to pull a deeper connection out of each student, but it often felt like I was exerting a lot more effort than my students were putting forth.

Then, one day, I ran across a blog post by Krista from The Second Grade Superkids. She shared a lesson she did with her students where she explained the difference between deep connections and surface connections. (The lesson can be traced back to Tanny McGregor's book called Comprehension Connections.) The lesson requires a glass of water, a ping-pong ball, and a golf ball. She began the lesson by dropping the ping-pong ball into the glass of water. Obviously, it stayed afloat on the surface of the water. She compared this floating ball to the surface connections we make while reading. Surface connections do not help us understand the story any better- they just sit on the surface of the text. Then she dropped the golf ball into the water, and it immediately sank to the bottom of the glass. She compared the golf ball to the deep connections that we should make while reading. Deep connections help us understand the story and infer the author's message.

This lesson resonated with me. I wish I would have found this blog post while I was still teaching reading groups!! I loved the analogy in this lesson so much that I immediately pulled out my anchor chart and markers, and created a connections anchor chart that illustrated the point. I believe hanging the anchor chart will serve as a reminder for students long after the initial lesson presentation is over.


Teach your students the difference between a surface connection and a deep connection with this anchor chart idea! After this lesson, your students will be more proficient at making connections while they are reading. A FREE personal anchor chart is also included!

I decided to share this lesson idea and anchor chart with you today in case you want to replicate it for your students! At the beginning of the school year, we teachers spend a lot of time teaching students our expectations, and this falls right in line with teaching students our expectations when we ask them to make a connection to what they are reading. If you want to dive even further into this topic and show your students several examples of well-written deep connections, feel free to check out my Making Connections PowerPoint or bundle of resources.

Finally, I want to share two personal anchor charts I made related to this topic. (I call them personal anchor charts because students can glue them into their reading notebooks and refer to them whenever they wish.) As you can see, the first one provides definitions of the four types of connections. The second one is a replica of the anchor chart shown above.

Use these personal anchor charts to teach students about the four types of connections that a reader can make, and how to write a strong connection. The chart on the right is a replica of a larger anchor chart, and it is FREE!

The anchor chart on the left is part of my Personal Anchor Charts for 27 Reading Skills resource. Click on the link to check it out.

The anchor chart on the right is FREE! Click here to download it.


If you are looking for some ready-to-go resources for teaching your students about making deep connections rather than surface connections, feel free to check out my PowerPoint and/or bundle. It includes many examples of surface connections, along with revised deep connections. Just click on the image to check it out!
Making Connections PowerPoint- this is an engaging, memorable way to teach students how to make connections while reading! It includes four types of connections (text-to-self, text-to-text, text-to-media, and text-to-world), along with stressing the difference between surface connections and deep connections.


Making Connections Bundle- Use these activities to teach your students about the four types of connections and how to write strong connections.


Thank you for stopping by today!

-Deb

Pin for future reference:
Teach your students the difference between a surface connection and a deep connection with this anchor chart idea! After this lesson, your students will be more proficient at making connections while they are reading. A FREE personal anchor chart is also included!


Powered by Blogger.
Back to Top